Usage
Now that we have completed the installation of Ember-CSI, we can manage our Storage Backend in our Container Orchestrator.
In this section examples will be provided both for the OpenShift Web Console and for the command line in the form of YAML manifests.
The same YAML manifests work on Kubernetes and OpenShift, the only difference is the command to invoke. For Kubernetes we’ll use kubectl` and oc for OpenShift:
$ # On OpenShift
$ oc apply -f manifest.yaml

$ # On Kubernetes
$ kubectl apply -f manifest.yaml
NOTE: In all the examples we’ll assume we created the Storage Backend with the default name example using the Operator, and that the Storage Class automatically created is example.ember-csi.io
Volume creation
We can create 2 types of volumes, Block and File, and both are supported by Ember-CSI, but OpenShift forms don’t allow specifying the type on creation, so they always default to File.
To create a volume we go to Storage > Persistence VolumeClaims and click on Create Persistent Volume Clain.

On the next page we must select the Storage Class created by the operator, give the PVC a unique name, select the Access Mode and the size.
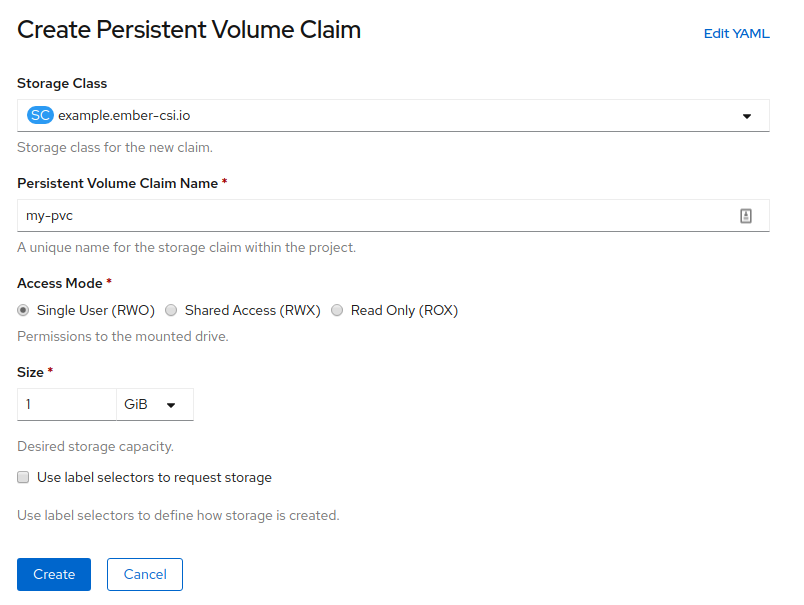
Warning
Ember-CSI only supports the Shared Access (RWX) Access Mode for Block volumes.
Note
OpenShift doesn’t support selecting the type of volume we want to create, so we’ll have to use YAML if we want to create a Block volume.
To select the type of volume we want in our YAML we’ll use the volumeMode parameter. Acceptable values are Block and Filesystem, the default being Filesystem.
Example of a PVC manifest using this default:
apiVersion: v1
kind: PersistentVolumeClaim
metadata:
  name: my-pvc
spec:
  accessModes:
  - ReadWriteOnce
  resources:
    requests:
      storage: 1Gi
  storageClassName: example.ember-csi.io
Similar PVC example for a Block volume:
apiVersion: v1
kind: PersistentVolumeClaim
metadata:
  name: my-block-pvc
spec:
  accessModes:
    - ReadWriteOnce
  volumeMode: Block
  resources:
    requests:
      storage: 3Gi
  storageClassName: example.ember-csi.io
Using volumes
Using a dynamically created PVC is as easy as adding a persistentVolumeClaim parameter with the claimName in the volumes section of our manifest:
kind: Pod
apiVersion: v1
metadata:
  name: my-app
spec:
  containers:
    - name: my-frontend
      image: busybox
      volumeMounts:
      - mountPath: "/data"
        name: my-csi-volume
      command: [ "sleep", "1000000" ]

  volumes:
    - name: my-csi-volume
      persistentVolumeClaim:
        claimName: my-pvc
Expanding Volumes
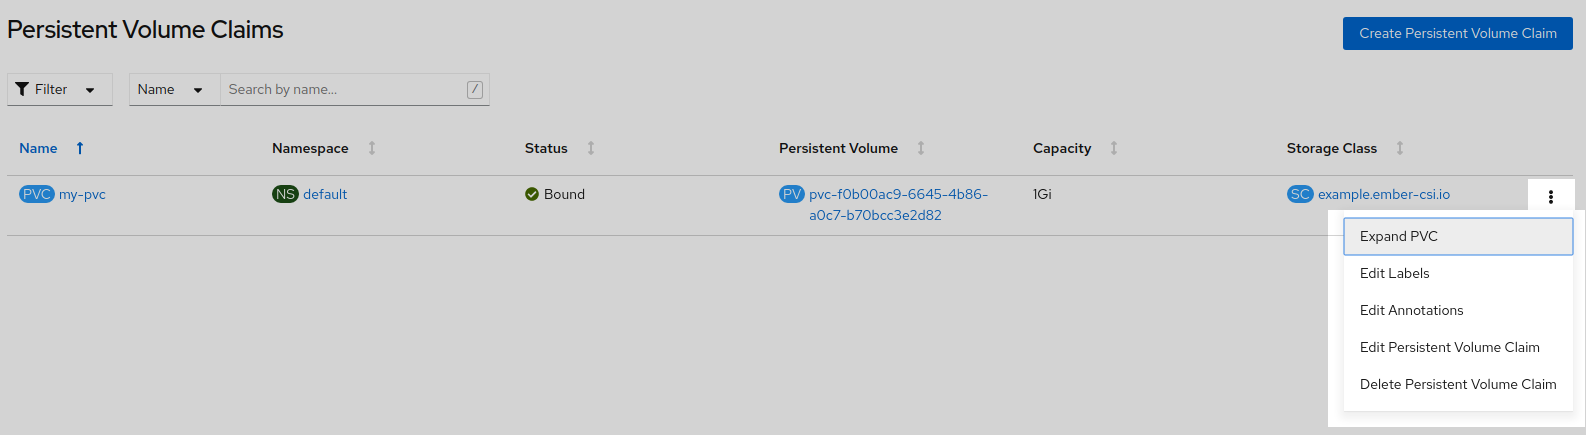
We can expand already created volumes to have more space without losing existing data. The operation is called expanding, and it’s very straightforward. In the web console we just go to the actions we can do in the PVC and select Expand PVC.
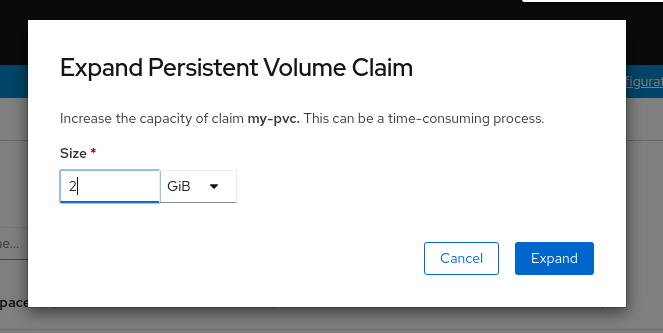
Then write the new size, that must be greater or equal than the existing size, and click on Expand.
When using the command line and a YAML manifest, we just need to modify the original contents with the new storage size, and it’s important to use apply and not create on the command line:
apiVersion: v1
kind: PersistentVolumeClaim
metadata:
  name: csi-pvc
spec:
  accessModes:
    - ReadWriteOnce
  resources:
    requests:
      storage: 2Gi
  storageClassName: example.ember-csi.io
Volume cloning
Volume cloning is the process of creating a new volume with the same contents as the source volume.
The new volume must be greater or equal in size as the original one and the source volume must be specified in the dataSource parameter, which is not available yet in the OpenShift Web Console, so we’ll have to use YAML to do it:
apiVersion: v1
kind: PersistentVolumeClaim
metadata:
  name: cloned-vol
spec:
  storageClassName: example.ember-csi.io
  volumeMode: Block
  dataSource:
    name: my-block-pvc
    kind: PersistentVolumeClaim
  accessModes:
    - ReadWriteOnce
  resources:
    requests:
      storage: 5Gi
Snapshot creation
During the deployment phase the Operator also creates a VolumeSnapshotClass for our Storage Backend with the same name as the StorageClass so we can easily create snapshots.
Note
As of OpenShift 4.5 the Web Console doesn’t have support for snapshots, but the necessary code is being merged in master, so it will most likely be available in OpenShift 4.6.
So we’ll have to use a YAML manifest and use the source parameter to define the volume we want to snapshot.
apiVersion: snapshot.storage.k8s.io/v1beta1
kind: VolumeSnapshot
metadata:
  name: my-snapshot
spec:
  volumeSnapshotClassName: example.ember-csi.io
  source:
    persistentVolumeClaimName: my-block-pvc
Restoring a snapshot
To restore an already created snapshot we’ll have to create a new volume and use our snapshot as its source.
The new volume must be of greater or equal size than the snapshot.
apiVersion: v1
kind: PersistentVolumeClaim
metadata:
  name: restored-snapshot
spec:
  storageClassName: example.ember-csi.io
  dataSource:
    name: my-snapshot
    kind: VolumeSnapshot
    apiGroup: snapshot.storage.k8s.io
  accessModes:
    - ReadWriteOnce
  resources:
    requests:
      storage: 3Gi
Volume deletion
The Storage Class created by the operator is defined with a Delete ReclaimPolicy, which means that once we delete the PVC the dynamically created PV will be deleted.
We can delete a volume in the OpenShift Web Console by going to Storage > Persistence VolumeClaims and look for the PVC we want to delete and in its actions we select Delete Persistent Volume Claim:
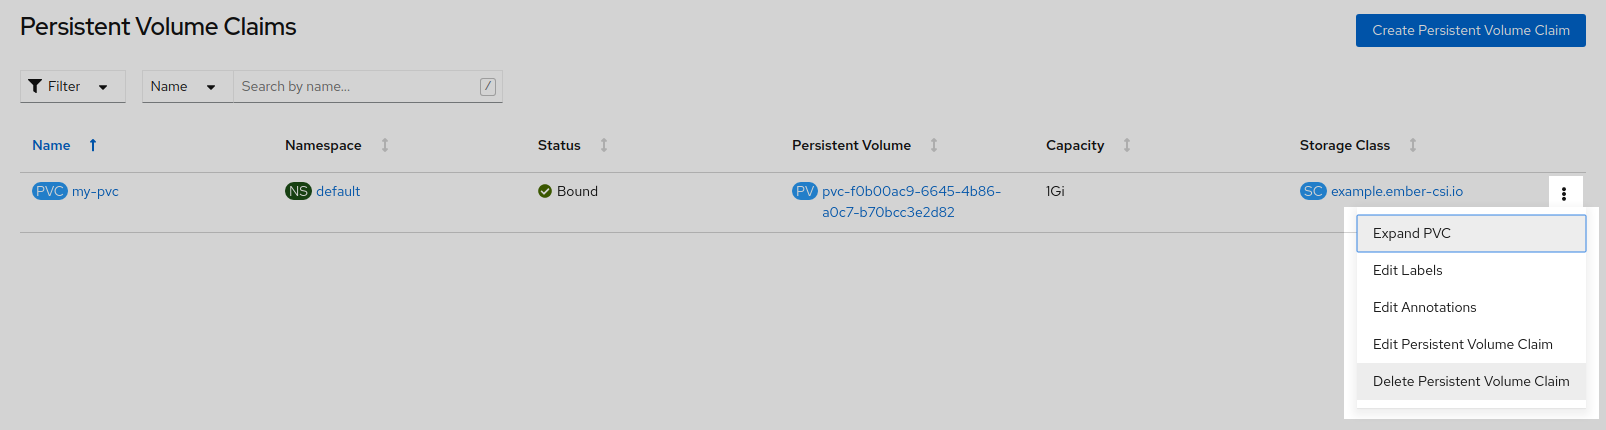
Deletion requires confirmation, so we’ll have to click on the Delete volume:

Deleting the PVC from the command line can be done using the name:
$ oc delete pvc my-block-pvc
Or with the manifest we used to create it:
$ oc delete -f manifest.yaml
Snapshot deletion
Note
As of OpenShift 4.5 the Web Console doesn’t have support for snapshots, but the necessary code is being merged in master, so it will most likely be available in OpenShift 4.6.
Deleting a VolumeSnapshot from the command line can be done using the name:
$ oc delete pvc my-snapshot
Or with the manifest we used to create it:
$ oc delete -f manifest.yaml